Why you should use migrations?#
Many people ask this question and I have tried to make this list to highlight the main advantages about the use of migrations:
Version Control: One of the main and most important is to be able to have a versioning of the different modifications of the database schema. Without the migrations, these schema changes would be incoherent and impossible to track, which would cause versioning problems and possible errors.
Rollback: It’s always necessary to have a rollback system in case of any failure. A migrations system always has two methods up to apply the changes in the database and down in charge of reverting the changes quickly and consistently :-)
Automation and CI/CD Integration: Migrations can be automated, allowing them to be part of the CI/CD pipeline. This helps in deploying changes smoothly and consistently without manual intervention.
We can find many more advantages but I think these points represent a good summary of the main advantages.
How to implement migrations in Golang?#
Go doesn’t support migrations natively for that propuso we can use the popular golang-migrate package also if you use an ORM like GORM you can use it for that.
Both packages are very popular but in this example I’ll use golang-migrate because I am not interested in implementing an ORM.
Show me the code!#
Let’s see step by step how to implement a simple application to see how it is used.
To follow this article you’ll need: Go and Docker with Docker Compose
Infrastructure#
Create the file docker-compose.yml in your root directory where we’ll define your favourite DB, in my case use a MariaDB but feel free to use another one.
 1
 2
 3
 4
 5
 6
 7
 8
 9
10
11
12
13
14
15
16
| services:
mariadb:
image: mariadb:11.5.2
container_name: mariadb_example_go_migration
ports:
- "3306:3306"
environment:
- MYSQL_DATABASE=app
- MYSQL_ROOT_PASSWORD=root
- TZ=Europe/Berlin
volumes:
- mariadbdata:/var/lib/mysql
volumes:
mariadbdata:
driver: local
|
If you prefer you can use Docker directly instead of docker-compose:
1
2
| docker volume create -d local mariadbdata
docker run --name mariadb_example_go_migration -p 3306:3306 -e MYSQL_DATABASE=app -e MYSQL_ROOT_PASSWORD=root -e TZ=Europe/Berlin -v mariadbdata:/var/lib/mysql mariadb:11.5.2
|
Environment values#
Create or update the file .env in your root directory where you need to define the variables to connect our data base.
1
| DATABASE_DSN=root:root@tcp(localhost:3306)/app
|
Create a simple golang app#
Create a simple golang application to ensure successful DB connection and list all tables and estructure in the database with their structure. cmd/main.go
 1
 2
 3
 4
 5
 6
 7
 8
 9
10
11
12
13
14
15
16
17
18
19
20
21
22
23
24
25
26
27
28
29
30
31
32
33
34
35
36
37
38
39
40
41
42
43
44
45
46
47
48
49
50
51
52
53
54
55
56
57
58
59
60
61
62
63
64
65
66
67
68
69
70
71
72
73
74
75
76
77
| package main
import (
"database/sql"
"fmt"
"log"
"os"
"text/tabwriter"
_ "github.com/go-sql-driver/mysql"
"github.com/joho/godotenv"
)
func main() {
// Load .env variables
err := godotenv.Load()
if err != nil {
log.Fatal("Error loading .env file")
}
// Open connection with MySQL DB
db, err := sql.Open("mysql", os.Getenv("DATABASE_DSN"))
if err != nil {
log.Fatalf("Error opening database: %v\n", err)
}
defer db.Close()
// Ensure that the connection works
err = db.Ping()
if err != nil {
log.Fatalf("Error connecting database: %v\n", err)
}
fmt.Println("Connected to database")
// Execute the SHOW TABLES query to list all tables in the database
tables, err := db.Query("SHOW TABLES")
if err != nil {
log.Fatalf("Failed to execute SHOW TABLES query: %v\n", err)
}
defer tables.Close()
fmt.Println("Database structure:")
for tables.Next() {
var tableName string
if err := tables.Scan(&tableName); err != nil {
log.Fatalf("Failed to scan table name: %v\n", err)
}
w := tabwriter.NewWriter(os.Stdout, 0, 0, 2, ' ', tabwriter.Debug)
fmt.Printf("\n[Table: %s]\n\n", tableName)
fmt.Fprintf(w, "%s\t%s\t%s\t%s\t%s\t%s\t\n", "Field", "Type", "Null", "Key", "Default", "Extra")
// Get the structure of the current table
structureQuery := fmt.Sprintf("DESCRIBE %s", tableName)
columns, err := db.Query(structureQuery)
if err != nil {
log.Fatalf("Failed to describe table %s: %v\n", tableName, err)
}
defer columns.Close()
for columns.Next() {
var field, colType, null, key, defaultVal, extra sql.NullString
err := columns.Scan(&field, &colType, &null, &key, &defaultVal, &extra)
if err != nil {
log.Fatalf("Failed to scan column: %v\n", err)
}
fmt.Fprintf(w, "%s\t%s\t%s\t%s\t%s\t%s\t\n",
field.String, colType.String, null.String, key.String, defaultVal.String, extra.String)
}
w.Flush()
}
}
|
And when we run it we have a similar output:

Migrate CLI#
To run golang-migrate CLI basically you have two methods install CLI locally or run through oficial Docker image: migrate/migrate.
Personally I prefer de docker variant but in this tutorial illustrate both variants.
How to generate migration#
The first step is create an empty migration with the next command.
1
2
| #CLI variant
migrate create -ext sql -dir ./database/migrations -seq create_users_table
|
1
2
3
| #Docker CLI variant
docker run --rm -v $(pwd)/database/migrations:/migrations migrate/migrate \
create -ext sql -dir /migrations -seq create_users_table
|
ext: Extension of the file to be generated.dir: Directory where our migration will be created.seq: Migration sequence name.
This command will be generated two empty files on database/migrations/ folder: 000001_create_users_table.up.sql and 000001_create_users_table.down.sql
On 000001_create_users_table.up.sql file define SQL for create a table users:
1
2
3
4
5
6
| CREATE TABLE `users` (
`id` VARCHAR(36) NOT NULL PRIMARY KEY,
`name` VARCHAR(255) NOT NULL,
`email` VARCHAR(255) NOT NULL UNIQUE,
`password` VARCHAR(255) NOT NULL
);
|
On 000001_create_users_table.down.sql file define SQL to revert all changes made by up, in this case we have to delete users table:
1
| DROP TABLE IF EXISTS `users`;
|
How to apply migration#
The following command applies all pending migrations. You can also define the number of migrations to apply by adding the number after the up.
1
2
| #CLI variant
migrate -path=./database/migrations -database "mysql://root:root@tcp(localhost:3306)/app" up
|
1
2
3
| #Docker CLI variant
docker run --rm -v $(pwd)/database/migrations:/migrations --network host migrate/migrate \
-path=/migrations -database "mysql://root:root@tcp(localhost:3306)/app" up
|
path: Path to migrations directory.database: Define you database DSN connection.
NOTE : When running the migration for the first time a table “schema_migrations” will be created in which the migration knows the version number applied.
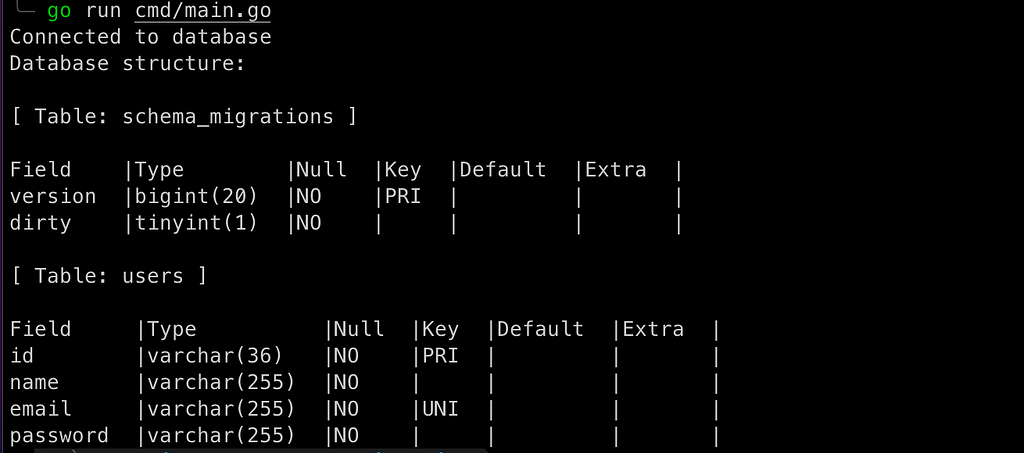
And run our Golang application to display the results:

Adding new migration#
Add a new column phone on users table
1
2
3
4
5
6
| #CLI variant
migrate create -ext sql -dir ./database/migrations -seq add_column_phone
#Docker CLI variant
docker run --rm -v $(pwd)/database/migrations:/migrations migrate/migrate \
create -ext sql -dir /migrations -seq add_column_phone
|
1
2
| -- 000002_add_column_phone.up.sql
ALTER TABLE `users` ADD `phone` VARCHAR(255) NULL;
|
1
2
| -- 000002_add_column_phone.down.sql
ALTER TABLE `users` DROP `phone`;
|
1
2
3
4
5
6
| #CLI variant
migrate -path=./database/migrations -database "mysql://root:root@tcp(localhost:3306)/app" up
#Docker CLI variant
docker run --rm -v $(pwd)/database/migrations:/migrations --network host migrate/migrate \
    -path=/migrations -database "mysql://root:root@tcp(localhost:3306)/app" up
|
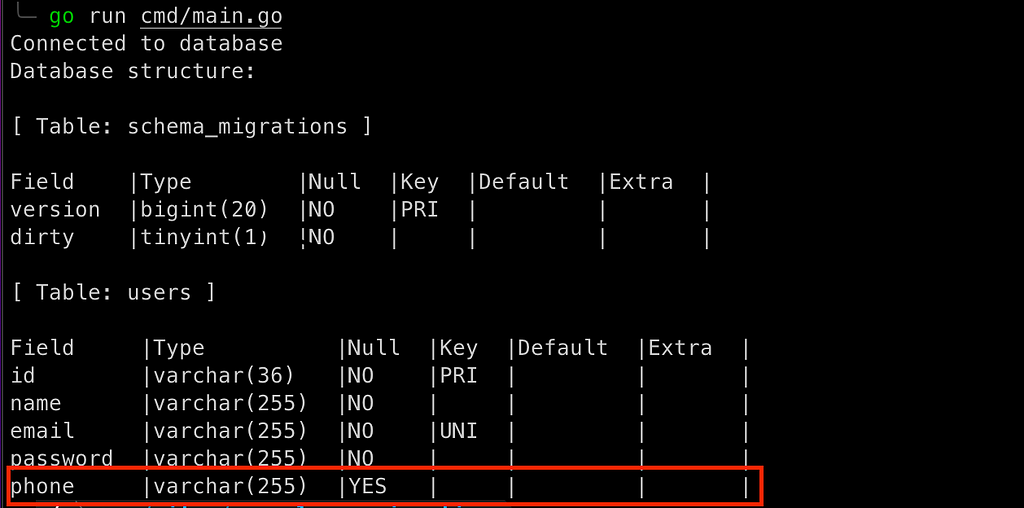
And when you run it from our Golang application you can see the new field:

How to revert migration#
With the following command we can easily rollback the applied. migrations. In the following example we can see how we reverse the last migration applied:
1
2
| #CLI variant
migrate -path=./database/migrations -database "mysql://root:root@tcp(localhost:3306)/app" down 1
|
1
2
3
| #Docker CLI variant
docker run --rm -it -v $(pwd)/database/migrations:/migrations --network host migrate/migrate \
-path=/migrations -database "mysql://root:root@tcp(localhost:3306)/app" down 1
|
WARNING : If you don’t define the number of migrations, ROLLBACK will be applied to ALL MIGRATIONS!
And then we can show that the last migration has been reverted and the phone field has been removed :-)

How to Resolve Migration Errors#
If a migration contains errors and is executed, that migration cannot be applied and the migration system will prevent any further migrations on the database until this migration is fixed.
And when trying to apply we will get a message like this:
1
| error: Dirty database version 2. Fix and force version.
|
Don’t panic, it is not difficult to get back to a consistent system.
First we have to resolve the corrupted migration, in this case version 2.
Once the migration is solved we have to force the system to the last valid version, in this case version 1.
1
2
| #CLI variant
migrate -path=./database/migrations -database "mysql://root:root@tcp(localhost:3306)/app" force 1
|
1
2
3
| #Docker CLI variant
docker run --rm -it -v $(pwd)/database/migrations:/migrations --network host migrate/migrate \
-path=/migrations -database "mysql://root:root@tcp(localhost:3306)/app" force 1
|
And now you can reapply the migrations without any problem ;-)
Makefile#
To improve our productivity and facilitate the use of these commands we can use Makefile. Below you can see the two variants: native client and docker.
CLI variant
1
2
3
4
5
6
7
8
9
10
11
12
13
14
15
16
17
18
19
20
21
22
| include .env
.PHONY: help create-migration migrate-up migrate-down migrate-force
help: ## Show help
@echo "\n\033[1mAvailable commands:\033[0m\n"
@@awk 'BEGIN {FS = ":.*##";} /^[a-zA-Z_-]+:.*?##/ { printf " \033[36m%-20s\033[0m %s\n", $$1, $$2 } /^##@/ { printf "\n\033[1m%s\033[0m\n", substr($$0, 5) } ' $(MAKEFILE_LIST)
create-migration: ## Create an empty migration
@read -p "Enter the sequence name: " SEQ; \
migrate create -ext sql -dir ./database/migrations -seq $${SEQ}
migrate-up: ## Migration up
@migrate -path=./database/migrations -database "mysql://${DATABASE_DSN}" up
migrate-down: ## Migration down
@read -p "Number of migrations you want to rollback (default: 1): " NUM; NUM=$${NUM:-1}; \
migrate -path=./database/migrations -database "mysql://${DATABASE_DSN}" down $${NUM}
migrate-force: ## Migration force version
@read -p "Enter the version to force: " VERSION; \
migrate -path=./database/migrations -database "mysql://${DATABASE_DSN}" force $${VERSION}
|
Docker CLI variant
1
2
3
4
5
6
7
8
9
10
11
12
13
14
15
16
17
18
19
20
21
22
23
24
25
26
| include .env
.PHONY: help create-migration migrate-up migrate-down migrate-force
help: ## Show help
@echo "\n\033[1mAvailable commands:\033[0m\n"
@@awk 'BEGIN {FS = ":.*##";} /^[a-zA-Z_-]+:.*?##/ { printf " \033[36m%-20s\033[0m %s\n", $$1, $$2 } /^##@/ { printf "\n\033[1m%s\033[0m\n", substr($$0, 5) } ' $(MAKEFILE_LIST)
create-migration: ## Create an empty migration
@read -p "Enter the sequence name: " SEQ; \
docker run --rm -v ./database/migrations:/migrations migrate/migrate \
create -ext sql -dir /migrations -seq $${SEQ}
migrate-up: ## Migration up
@docker run --rm -v ./database/migrations:/migrations --network host migrate/migrate \
-path=/migrations -database "mysql://${DATABASE_DSN}" up
migrate-down: ## Migration down
@read -p "Number of migrations you want to rollback (default: 1): " NUM; NUM=$${NUM:-1}; \
docker run --rm -it -v ./database/migrations:/migrations --network host migrate/migrate \
-path=/migrations -database "mysql://${DATABASE_DSN}" down $${NUM}
migrate-force: ## Migration force version
@read -p "Enter the version to force: " VERSION; \
docker run --rm -it -v ./database/migrations:/migrations --network host migrate/migrate \
-path=/migrations -database "mysql://${DATABASE_DSN}" force $${VERSION}
|
Repository#
The code for this tutorial can be found in the public: GitHub - albertcolom/example-go-migration
You can read the article on Medium


